
This is part four of the four-part crash course aiming to introduce teams and individuals to the Akeneo-Magento stack with a dedicated connector module. In a step-by-step manner, the guide allows to learn and get a practical experience with
- General set-up and basic entities,
- Data migration from Magento to Akeneo,
- Connector module functionality, import/export verification,
- Akeneo data manipulation using .csv files.
In this part, you will learn to modify/create new products, attributes, categories, etc. using .csv files and Akeneo import profiles. Additionally, you will find out how to use Akeneo’s export profiles to export data into a .csv file, edit it and then import it back into Akeneo.
Exporting Data
To gain a basic understanding, use Akeneo’s Category Export Profile, to export all categories into a .csv file:

You can export data by clicking on the export profile and clicking on the Export Now button.
Open Using Spreadsheet Software
Important: When we import data back into Akeneo, it will expect a .csv file in a specific format ( ; as a field separator, and " as a string delimiter). Some spreadsheet apps can’t export .csv in that format (e. g. Google Sheets), please avoid using those apps. (For the purposes of this guide we will be using Libre Office Writer.)
Open the exported .csv file using any spreadsheet app supporting the mentioned format.
Configure The Spreadsheet
The main thing you need to know is the Separator type (also known as Delimiter). In the case of Akeneo-exported .csv files, the delimiter is a semicolon ( ; ), and the string delimiter is a double quote( “ ):

Expected result: After opening the file, you should see something like this

Components of the export file
The top row is a header row, containing information about the fields.
Since this is a category export, the fields are as follows:
- code – a unique identifier value for each category
- label(s) – category labels for each locale
- parent – a commonly used value referencing the parent category’s code.
CSV import
Editing and adding fields is covered in later sections of the current guide. For now, we will save the file and check if we can import it into Akeneo:
- Save the file and in Akeneo
- Go to
Imports, choose the category imports profile and import into Akeneo:

Why Manipulate Data This Way
This may sometimes be a faster and simpler way of making changes, even though the option of bulk-editing products directly in Akeneo remains.
For example, you need to increase all prices by 20%. All you have to do is export all products in a spreadsheet, apply a function to make changes, and then import back the modified file.
Or, perhaps, you need to write multiple translations for product descriptions. Doing it directly in Akeneo requires a lot of clicking: choose a product > select locale > update the values > save >select different locale etc. By using the .csv approach, you can make an export profile that only exports the fields you need, and have all the fields easily modifiable in the spreadsheet app.
Create New Categories
Open the exports tab in Akeneo and choose .csv Category Export Profile. In case none are available, create one.
Open the exported file in a spreadsheet app.
Scroll down and create a new category – that is a child of the master category. Call it Test Category.
Add some sub-categories under the new test category.

All other categories can be removed from the file since they are not being modified. This is recommended in order to avoid importing old data (i.e., while you are working on the spreadsheet, someone else may modify a different set of categories; thus, your import may rewrite someone else’s newly added values).
Expected result: The spreadsheet should now look like this

From here you can save the file and import it back into Akeneo using a .csv Category Import Profile. When the import is complete, go to Settings > Categories and verify that the new categories are imported:

Create New Attribute
Export the attributes the same way as you did with categories in the section above.
Open the exported file using the spreadsheet app. This time you will notice there are a lot more columns:

While most of these are optional, the required fields for a new attribute are:
- code
- group
- type
For the purposes of this guide, we will remove all columns in the file, leaving only the required ones, plus label-en_US.
Additionally, remove all exported attributes, since we won’t be updating any of those.
The resulting file should now only contain the header row:

Add a new simple select test attribute, set the group to marketing, and set type to pim_catalog_simpleselect (for a list of available types, check Akeneo Documentation):

Save the file, and import it back into Akeneo, same as before – using the attribute import profile. When the import is complete, the new attribute can be found in Settings > Attributes:

Add Attribute Options
In part 3 of this guide, we have covered adding simple select attributes. Now we will add some options to the attribute.
Go to Exports, and this time do a csv attribute option export.
Open the resulting file in your spreadsheet app.
Remove all rows except the header row.
Add three new options named ‘first’, ‘second’ and ‘third’.
In the ‘attribute’ column you have to reference the code of your test attribute: test_attribute.
Leave sort_order empty:

Save the file, and import it back into Akeneo.
Expected result: The test attribute should now have the new options.

Working with Product Models and Products
So far we have covered some basic things you can do with .csv imports. This is important for learning, but, truth be told, in most cases doing things like adding categories and attribute options is faster and easier using Akeneo’s user interface.
In this section, we will take the next steps to further understand working with .csv exports.
Bulk Price Update Example:
In the Why Manipulate Data This Way section above we mentioned an example of using .csv exports to increase all product prices by 20%. This is what we’ll be doing in this section.
Same as previously, we need to export product data using Akeneo’s export profile. But first, let’s edit the profile settings to only export the fields we need.
Open the export profile editor.
Go to the Content tab and set the product export conditions. The goal is to export all products with only one attribute: price.
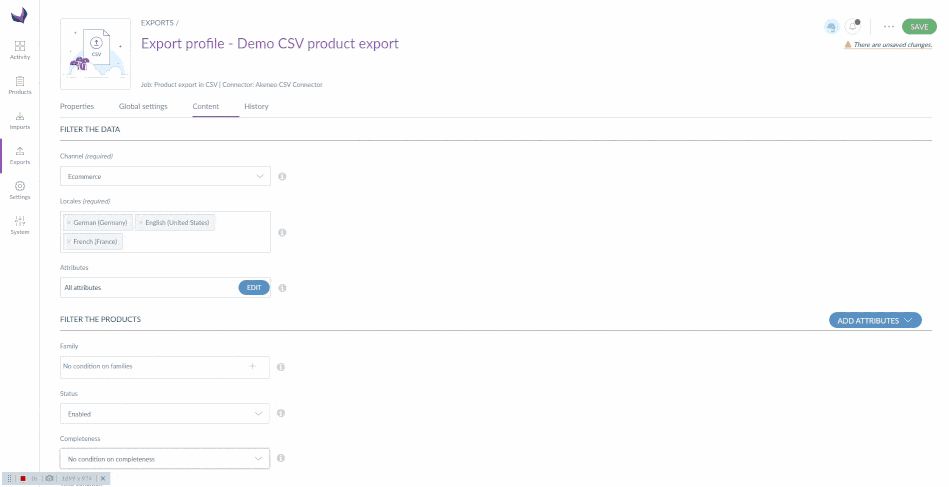
When this is done, save the profile, export, and open it:

As you can see, some products have a price set, others are empty. This part boils down to your ability to use the spreadsheet app, and as we know those apps can do almost anything. You can take a look at this article for some pointers on how to increase all prices by using “Paste Special“ functionality.
Once the prices are updated, import them back into Akeneo and check the result.
Add New Product Model
Make a product model export, and open it in the spreadsheet app.

Out of the multiple columns available for product models only three are required:
- code (unique identifier);
- family_variant (code of the family variant – these codes can be viewed when exporting family variants);
- parent (a reference to product model – used when adding variants for a product model);
Other notable fields:
- categories (list of comma-separated category codes);
- name
- description-<locale_code>;
- variation_name-<locale_code>;
- price;
Let’s add a test product model. Edit the spreadsheet to only keep the required fields and the notable fields mentioned above.

Add the product model under one of the categories you have made earlier (sub_category_1).
Add some product variants. Because the family variant is clothing_color_size, you also need to provide a color attribute as it is required in the family variant:

Here, in the ‘color’ attribute, you must set a code referencing one of the options of the color attribute:
With this information you can fill the product model fields:

Save the spreadsheet, import it into Akeneo, and find the products in the product list.

Add New Product
Make a product export and open it in your spreadsheet app.
Products may have multiple attributes, but the fields required when creating a product are:
- sku;
- enabled (1 or 0, depending on whether the product will be active);
- family (a reference to a family code);
- parent (has to be set if it is a configurable product);
Let’s add some new products for our product model we created in the previous section.
As our model was a 2-axis product, we must reference a size attribute code as well:

Expected result: When you import this into Akeneo, you should see the new products:

Have you found this information helpful? Make sure to check out the rest of the guide: pt.1, pt.2, and pt.3. Do you consider implementing Akeneo PIM in your business? Let us help you! Any questions? Feel free to get in touch: book a free consultation or schedule a call!

Share on: