As more and more eCommerce stores tend to offer personalized user experiences on their websites, almost every store start using GeoIP functionalities to show users correct language, currency, shipping information, etc. as soon as users land on the site. Most Magento installations use 3rd party extensions to make it possible and even though the extension sounds like the easiest way how to do it, it’s for sure not the safest one.
When an application needs GeoIP functionality there could be multiple implementations of that functionality, such as:
- CloudFront (or other CDN service)
Built-in functionality, which will pass appropriate header back to the application (best solution, because the implementation is delegated to the 3rd party and normally those implementations are rock-solid).
- Nginx module
Will pass appropriate header back to the application (bad solution, because you will need to build nginx from source; support of that module is outdated and you will lose easy update functionality).
- Varnish extension
Will pass the appropriate header back to the application.
- Parsing GeoIP database file inside application
Comparably slow in case of PHP implementation and will need to handle database updates in some way.
- Use Magento extension
Will lookup GeoIP data from MySQL database (which is the worst case scenario, because of poor extension implementation — storing 2M rows in the relational database).
Magento GeoIP Case Study:
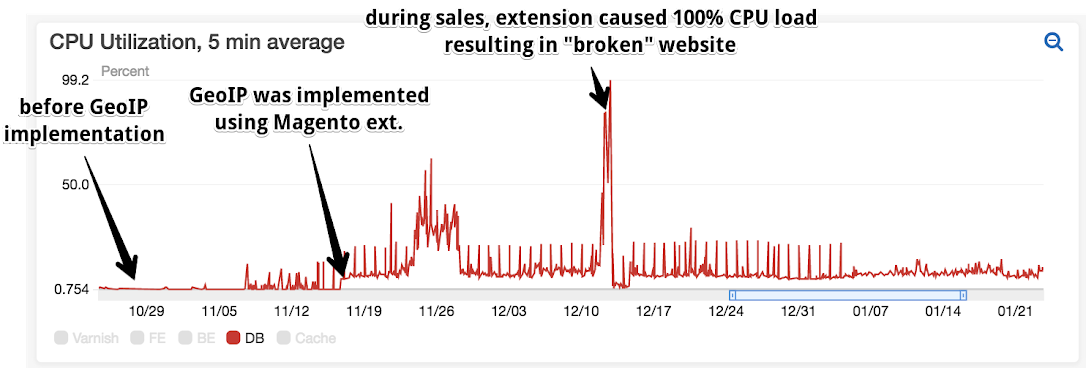
Recently one of Scandiweb clients had installed a 3rd party Magento GeoIP extension which caused a massive CPU load during sales, as can be seen from the chart below it caused almost 100% CPU load which resulted in the ‘broken’ website.

Scandiweb came to the rescue and replaced the 3rd party extension. In our use case, CDN implementation is not always available, but Varnish is commonly used, therefore we will be using Varnish extension to implement GeoIP functionality and Maxmind database.
Here we are going to share our guide on how to do it in 9 easy steps:
STEP 1:
Before installation, it could be worth upgrading the whole system, but if you are not sure what you are going to do, please skip this step:
sudo apt-get update

sudo apt-get upgrade -V

sudo apt-get dist-upgrade -V

sudo apt autoremove
STEP 2:
Add maxmind repository
sudo add-apt-repository ppa:maxmind/ppa

sudo apt-get update
STEP 3:
Install the required packages on the Varnish instance:
sudo apt-get install -V libvarnishapi-dev libvarnishapi1 pkg-config autoconf automake libtool make python-docutils libmaxminddb-dev varnishSTEP 4:
Install Varnish extension for the GeoIP:
sudo su

cd ~

git clone --recursive [https://github.com/fgsch/libvmod-geoip2](https://github.com/fgsch/libvmod-geoip2)

cd libvmod-geoip2/

./autogen.sh

./configure

make

make check

make install

exit
STEP 5:
Implement automatic updates for the GeoIP database:
Install automatic update package
sudo apt-get install -V geoipupdate

#Execute newly installed package in verbosity mode to check it is actually working as expected

geoipupdate -v
Normally you should be done just by installing “geoipupdate” package — it will create config files and free database will be downloaded, but it could be worth checking latest documentation, which can be found here.
STEP 6:
Add cron job to perform automatic updates:
**/etc/cron.d/deployed-varnish-root**

# m h dom mon dow user  command

PATH=/usr/local/sbin:/usr/local/bin:/usr/sbin:/usr/bin:/sbin:/bin

# Updates are once a week, +/- random time here

45 10 * * 1 root /usr/bin/geoipupdate
Note that path to the “geoipupdate” binary file can be different for you. Time is +/- random.
STEP 7:
Add GeoIP module to the Varnish:
**/etc/varnish/default.vcl**

**import** geoip2;

sub vcl_init {

    # Please note that absolute path must be used

**    new** country = geoip2.geoip2("/usr/share/GeoIP/GeoLite2-Country.mmdb");

}

sub vcl_recv {

    set req.http.X-Country-Code = country.lookup(

        "country/iso_code",

        std.ip(regsub(req.http.X-Forwarded-For, "^(d+.d+.d+.d+).*", "1"), client.ip)

);

}
Please note that Nginx “real IP” module must be correctly configured, so that Varnish can actually get real user IP address.
STEP 8:
Use GeoIP information in the PHP application
$_SERVER['HTTP_X_COUNTRY_CODE'] = "LV"STEP 9:
To test install ModHeader and add
X-Country-Code = LVAdditional information:
Varnish extension
Maxmind GeoIP database and automatic updates
Check out our Magento services here!
Want Scandiweb assistance with your next challenge? Do not hesitate to contact us at [email protected]


Share on: