You can find plenty of articles about exporting tracking extract data from Salesforce Marketing Cloud (SFMC) online. I relied on a few of them in the beginning.
However, the default export option to S3 features the export of one .zip file. That’s not very usable if you need to use those files in further pipelines. You would need to unzip the data. That was a bit puzzling for me at that moment.
Eventually, I came up with a solution where, upon exporting a .zip file to AWS S3, a Lambda function triggers, unzips the file, and then sorts each file into the right folder by its name. It also adds a date suffix to each file, so you always know when it was exported.
If you’re running into the same issue, I’ve written down all the steps I took – and included the full Lambda code – so hopefully it will save you some time.
After going through additional pipelines, this data was fed into streams in the Salesforce Data Cloud CDP, thus allowing for a better understanding of customer email interactions.
Also read:
- The Complete Guide to Data Ingestion in Salesforce Data Cloud
- A Practical Guide to Identity Resolution in Salesforce Data Cloud
What are tracking extracts in SFMC?
Tracking extracts are raw, event-level exports from Salesforce Marketing Cloud. Each one is a flat .csv that shows your email opens, link clicks, bounces, unsubscribes, and so on.
You can schedule these exports to land in S3 (or another external store), then pipe them into analytics platforms, data warehouses, or Salesforce Data Cloud.
Here’s a view of how these tracking extract tables connect:
Why export tracking extracts?
Three reasons:
- You want more control over the data. SFMC’s reporting tools are limited, while external exports let you clean, filter, and join data your way.
- You need more extract types. The built-in Starter Bundles only cover a handful of feeds, but tracking extracts open access to everything available, so you can pick and choose what to load into Salesforce Data Cloud.
- You want to backfill history. Bundles can’t reach past recent activity. Tracking extracts let you go back 30 days per batch.
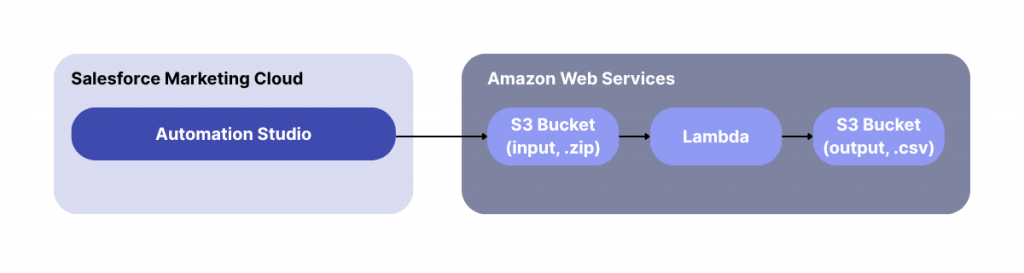
How the automated export works
Here’s the flow you’ll build:
- SFMC automation schedules a tracking extract and outputs a
.zipfile to a designated S3 “input” bucket - A Lambda function is triggered when a new
.ziparrives - The Lambda:
- Unzips the archive
- Renames each CSV with a date suffix
- Sorts files into S3 destination folders by filename
In the end, you have clean, clearly labeled .csv files in your S3 bucket ready for use in pipelines, dashboards, or customer data platform (CDP) ingestion.
Could you customly use SFMC’s SOAP/REST APIs instead? Sure. But unless you need dynamic logic or tight integration, Automation Studio provides a simpler, low-code way to handle this.
Sounds good? Let’s proceed!
Step 1: Set up your export in Salesforce Marketing Cloud
Use Automation Studio to run the export
Automation Studio is SFMC’s low-code workflow engine. It allows you to string together assets like data extracts, imports, SQL queries, scripts, and file transfers and schedule them to run automatically.
For this setup, you’ll need to configure an automation:
- Data Extract to generate the
.zipfile - File Transfer to send that file from SFMC’s internal storage (Safehouse) to S3

You’ll also need to set up a connection between SFMC and your AWS S3 bucket before the export can happen.
A note on Safehouse: It’s SFMC’s secure internal staging directory, encrypted at rest and separate from your FTP, where your export files are held before transfer.
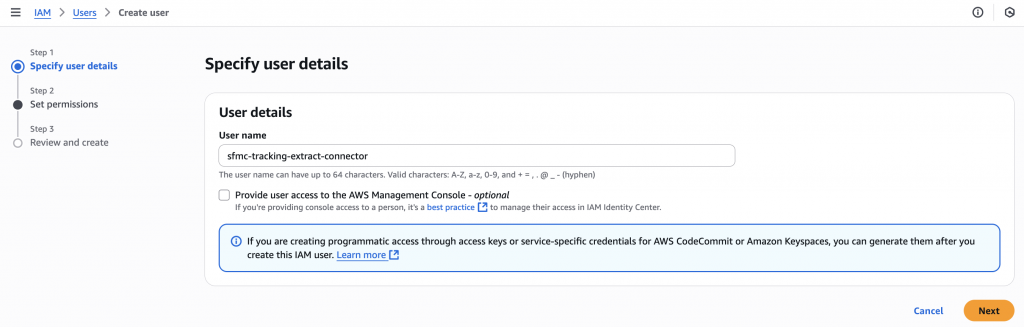
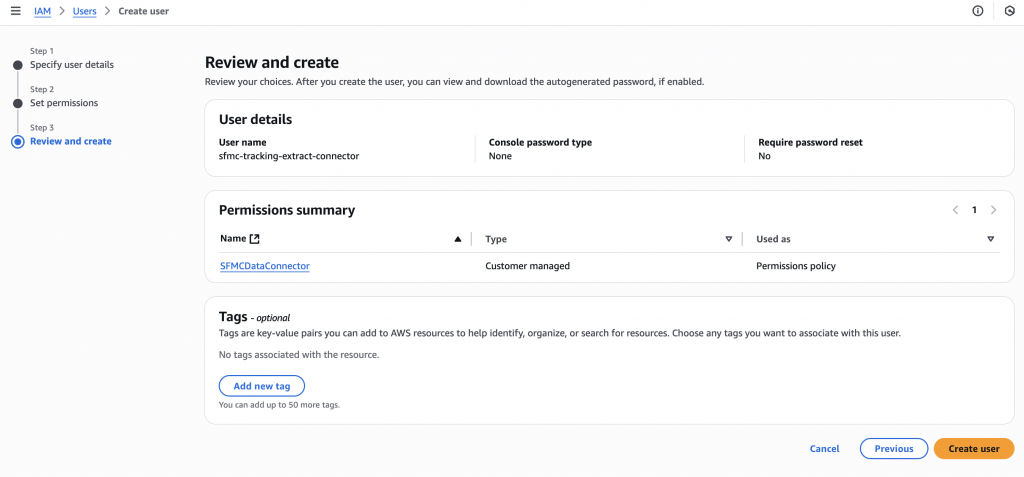
Create AWS credentials for SFMC
- In your AWS console, go to IAM → Users → Create user (set a user name, e.g.,
sfmc-tracking-extract-connectoror anything descriptive)
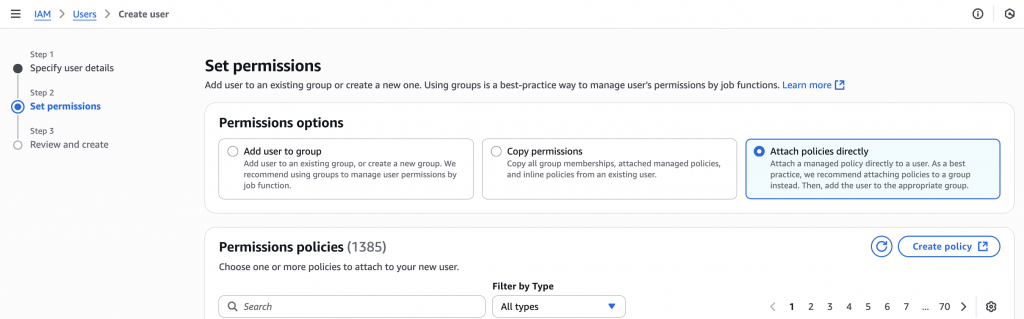
- Under Permissions, choose Attach policies directly → then Create policy
Use the JSON editor to define what this user can do. Grant read/write access to the specific S3 bucket and folder where your exports will land.
Here’s the code to use (change your bucket/folder data):
{
  // The policy language version
  "Version": "2012-10-17",

  // A list of individual permission statements
  "Statement": [
    {
      // A unique identifier for this statement; you can name it whatever you like
      "Sid": "AllowMCS3AccessToBucket",

      // Specifies whether to allow or deny the actions in this statement
      "Effect": "Allow",

      // Which S3 actions are permitted
      "Action": [
        "s3:ListBucket"
      ],
      // Which resources these actions apply to
      "Resource": [
        "arn:aws:s3:::your-bucket-name"    // Your S3 bucket’s ARN
      ]
    },

    {
      // Another identifier for grouping object-level permissions
      "Sid": "AllowMCS3AccessToBucketContent",
      "Effect": "Allow",

      "Action": [
        "s3:PutObject",
        "s3:GetObjectVersion",
        "s3:GetObject",
        "s3:DeleteObject"
      ],
      "Resource": [
        "arn:aws:s3:::your-bucket-name/zip-files/*",   // All files inside zip-files/ (adjust to your folder)
        "arn:aws:s3:::your-bucket-name/zip-files"      // The folder path itself
      ]
    }

  ]
}
Tip! You can find the bucket ARN if you go to the Bucket → Properties.
- After creating the policy, review the settings, attach tags if needed, and Create user
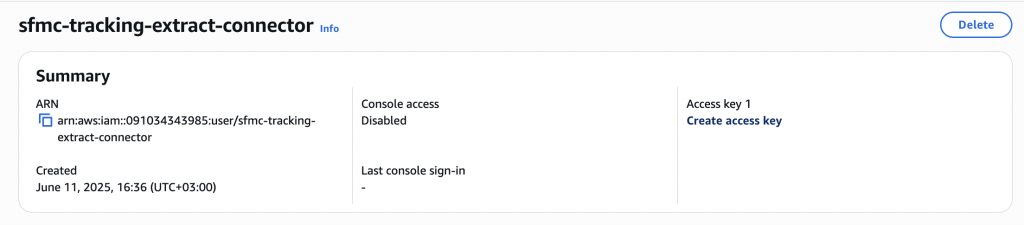
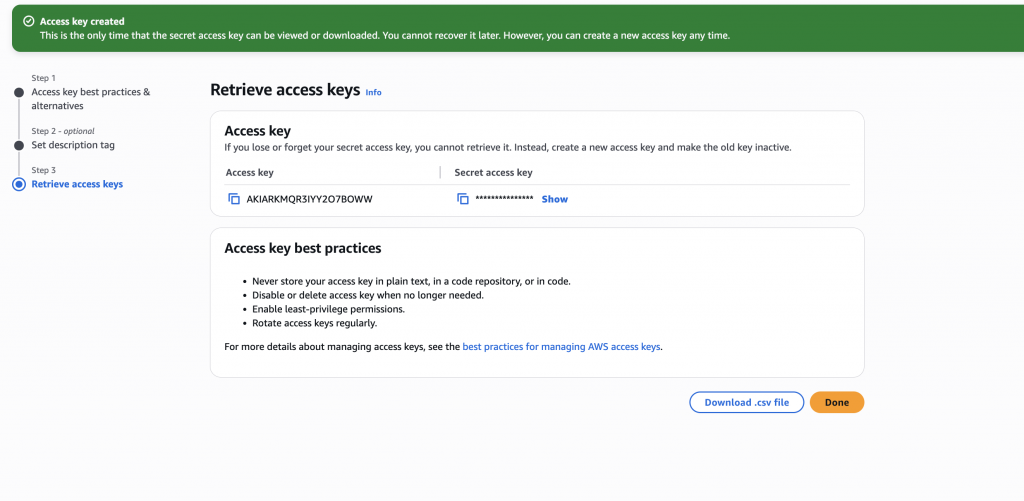
- Generate access keys by clicking Create access key, choose Third party, and acknowledge the warning
Important! Save the Access Key ID and Secret Access Key now – this is the only time you’ll see the secret; store them securely.
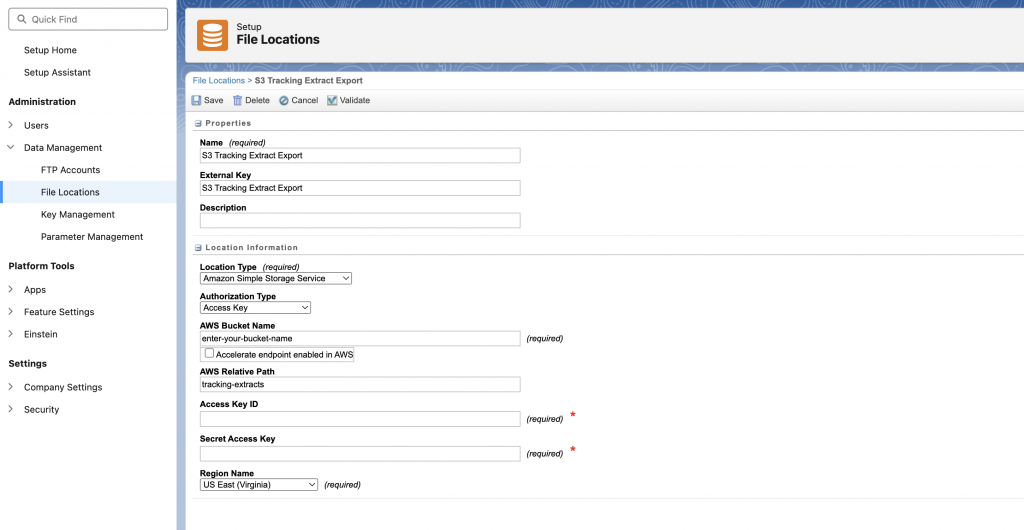
Add your S3 bucket to SFMC
- In Salesforce Marketing Cloud, go to Setup → Administration → Data Management → File Locations. Click Create and choose Amazon S3
- Fill in the form with the credentials you just generated:
- Access Key ID
- Secret Access Key
- Bucket Name
- (Optional) Prefix or folder path
- AWS Region
Things to double-check:
- Your access key, secret key, or role ARN for typos – invalid credentials will block all exports
- The region must match exactly; otherwise, SFMC won’t find your bucket
- Only enable Transfer Acceleration if you’ve enabled it in your bucket settings
- Make sure your IAM policy includes the required S3 permissions for listing, reading, and writing files.
Step 2: Set up the automation
- In Automation Studio, click New Automation, name it something like
SFMC Tracking → S3, and add these two activities in order:
- Data Extract
- File Transfer
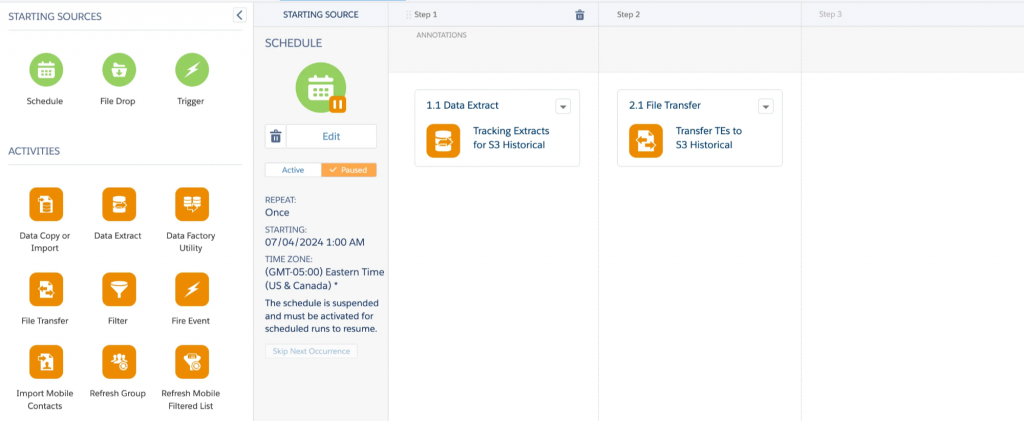
- Configure Data Extract
- Name:
sfmc_te_%%Month%%%%Day%%%%Year%%.zip(Date tokens auto-insert the run date into the filename) - Type: Tracking Extract
- Range: Rolling 1-day window (to grab the previous day’s data)
- Format: CSV
- Encoding: Choose what fits your system (UTF-8 is standard)
- Options: Select the tracking types you want: opens, clicks, bounces, etc.
- When you’ve double-checked everything, click Finish

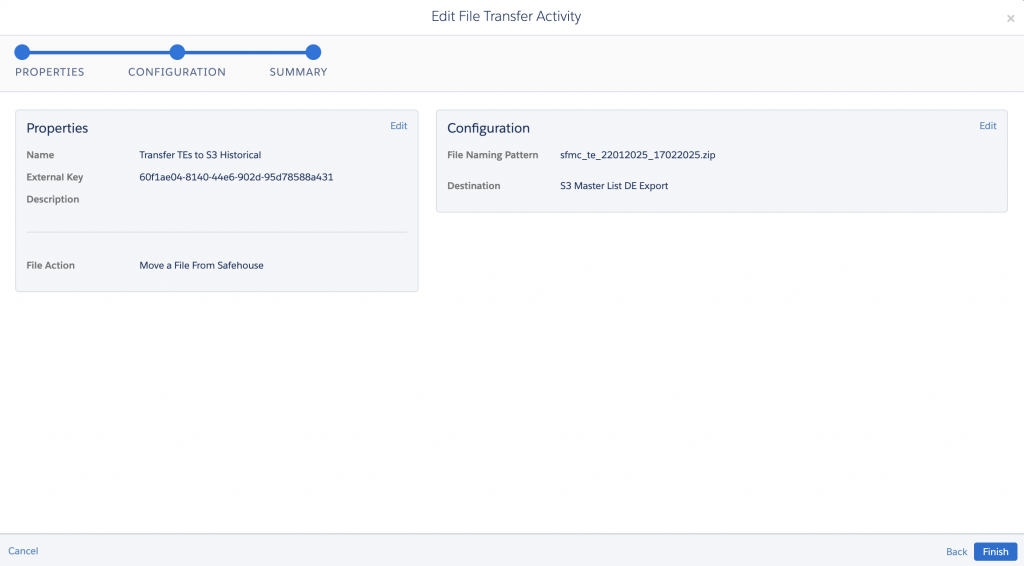
- Configure File Transfer
- Action: Move file from Safehouse
- File Pattern: Use the same name as above (e.g.,
sfmc_te_%%Month%%%%Day%%%%Year%%.zip) - Destination: Choose the S3 file location you set up
- Click Finish to save
- Once both steps are configured, add a Schedule to run the automation daily (or your preferred interval) and click Save. Flip the toggle to activate the schedule if it is paused and inactive; optionally, click Run Once to test and ensure your configurations are valid.
Step 3: Set up the AWS Lambda function to unzip and organize your export
AWS Lambda is a serverless compute service that runs your code in response to events, like a new file landing in S3.
You could also use AWS Glue (with its visual ETL interface or custom scripts) for batch data jobs, but Lambda excels at real-time, event-driven tasks.
Create a Lambda function
- In your AWS Console, go to Lambda → Functions → Create Function
- Select Author from Scratch
- Set a name (e.g.,
unzip-sfmc-tracking-exports) - Runtime: Python 3.12
- Create or choose an execution role with permissions to access S3
You can attach these custom policies and then proceed to create a function:
{
"Version": "2012-10-17",
"Statement": [
{
"Effect": "Allow",
"Action": [
"s3:ListBucket",
"s3:GetObject",
"s3:GetObjectVersion",
"s3:PutObject"
],
"Resource": [
"arn:aws:s3:::bucket", //adjust the bucket name
"arn:aws:s3:::bucket/*" //adjust the bucket name
]
},
{
"Effect": "Allow",
"Action": [
"logs:CreateLogGroup",
"logs:CreateLogStream",
"logs:PutLogEvents"
],
"Resource": "*"
}
]
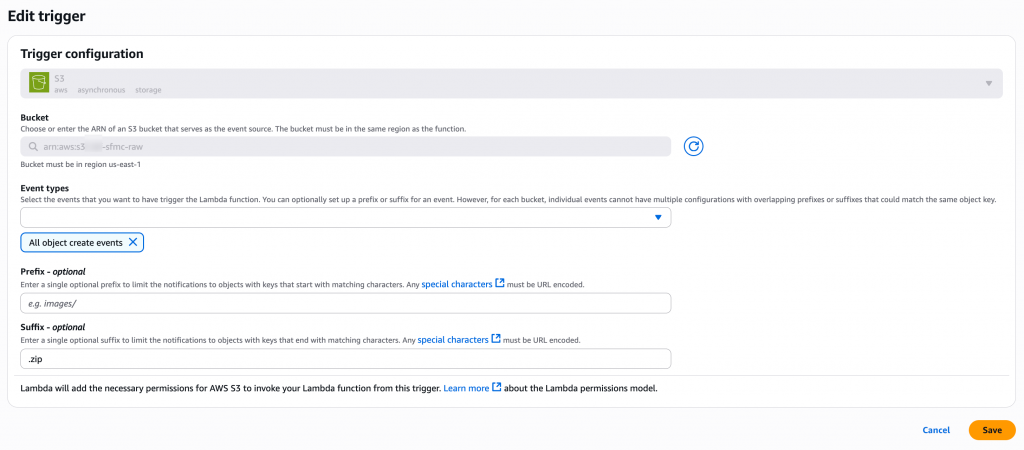
}Set up the trigger
This part is what makes the Lambda function run automatically.
- In your Lambda, scroll to the Triggers section → Click Add trigger

- Choose S3 as the source
- Specify the input bucket
- Select the file to react to all the object creation actions
- Suffix filter:
.zip, so that the function reacts only to ZIP files in the location - Click Save
Add the Python code
- Go to the Code tab in your function, where you’ll see a built-in code editor – paste in your unzipping logic here
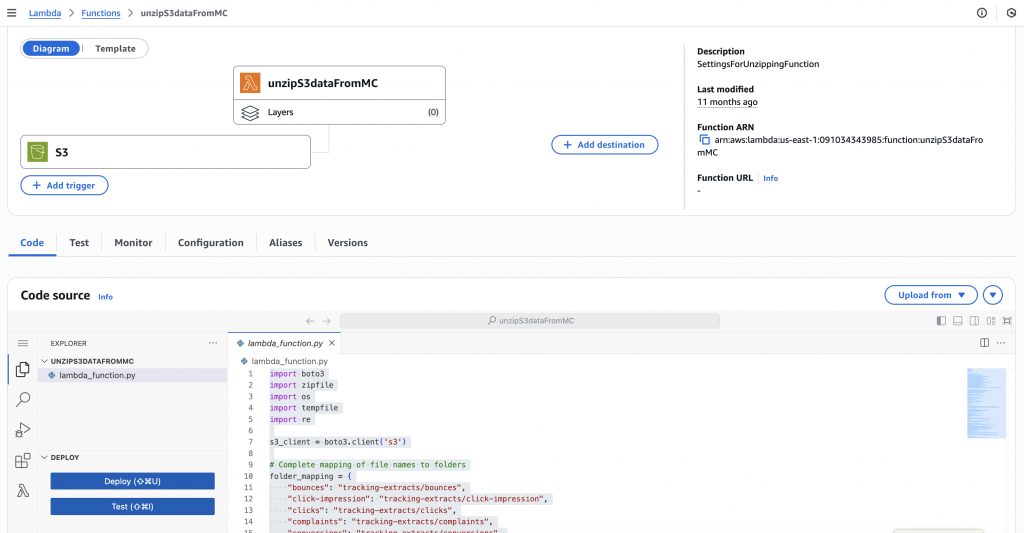
Here’s what the code does:
- Detects the new zip file
- Unzips the contents into memory
- Renames each file with a run-date suffix
- Sorts the files into folders based on the filename
- Add the following Python code. The structure of your extracted files depends on which tracking extract types you selected (e.g.
_click.csv,_open.csv, etc.). If you use different naming conventions, adjust the logic as needed.
import boto3
import zipfile
import os
import tempfile
import re

s3_client = boto3.client('s3')

# Complete mapping of file names to folders
folder_mapping = {
    "bounces": "tracking-extracts/bounces",
    "click-impression": "tracking-extracts/click-impression",
    "clicks": "tracking-extracts/clicks",
    "complaints": "tracking-extracts/complaints",
    "conversions": "tracking-extracts/conversions",
    "list-membership": "tracking-extracts/list-membership",
    "lists": "tracking-extracts/lists",
    "not-sent": "tracking-extracts/not-sent",
    "opens": "tracking-extracts/opens",
    "send-impression": "tracking-extracts/send-impression",
    "send-job-impression": "tracking-extracts/send-job-impression",
    "send-jobs": "tracking-extracts/send-jobs",
    "sent": "tracking-extracts/sent",
    "status-change": "tracking-extracts/status-change",
    "subscribers": "tracking-extracts/subscribers",
    "surveys": "tracking-extracts/surveys",
    "unsubs": "tracking-extracts/unsubs",
    "multiple-data-extension-send-lists": "tracking-extracts/multiple-data-extension-send-lists"
}

def extract_date_suffix(filename):
    # Pattern for _8digits_8digits or _8digits at the end before .zip
    pattern_range = re.compile(r'_(\d{8})_(\d{8})\.zip$')
    pattern_single = re.compile(r'_(\d{8})\.zip$')
    pattern_any = re.compile(r'_(\d+)\.zip$')

    # Check for range pattern first
    match = pattern_range.search(filename)
    if match:
        return f"{match.group(1)}_{match.group(2)}"

    # Check for single date pattern
    match = pattern_single.search(filename)
    if match:
        return match.group(1)

    # Check for any number of digits pattern
    match = pattern_any.search(filename)
    if match:
        return match.group(1)

    return None

def transform_filename(file_name):
    # Add hyphen between lowercase and uppercase letters and convert to lowercase
    transformed = re.sub(r'(?<=[a-z])(?=[A-Z])', '-', os.path.splitext(file_name)[0]).lower()
    return transformed

def lambda_handler(event, context):
    bucket_name = event['Records'][0]['s3']['bucket']['name']
    key = event['Records'][0]['s3']['object']['key']
    date_suffix = extract_date_suffix(key)

    if not date_suffix:
        print(f"Invalid filename format: {key}")
        return {
            'statusCode': 400,
            'body': 'Invalid filename format'
        }

    with tempfile.TemporaryDirectory() as tmpdir:
        download_path = os.path.join(tmpdir, os.path.basename(key))

        s3_client.download_file(bucket_name, key, download_path)

        with zipfile.ZipFile(download_path, 'r') as zip_ref:
            zip_ref.extractall(tmpdir)

        for file in os.listdir(tmpdir):
            if file != os.path.basename(key):  # Don't upload the original zip file
                file_path = os.path.join(tmpdir, file)

                # Transform the filename and check against the folder mapping
                base_name = os.path.splitext(file)[0]
                transformed_file_name = transform_filename(base_name)
                folder = folder_mapping.get(transformed_file_name)
                if not folder:
                    print(f"Skipping file: {file} (no matching folder)")
                    continue

                # Rename the file to include the date(s)
                new_file_name = f"{base_name}_{date_suffix}{os.path.splitext(file)[1]}"

                # Upload the renamed file to the correct folder
                s3_client.upload_file(file_path, bucket_name, f"{folder}/{new_file_name}")

    return {
        'statusCode': 200,
        'body': 'Files unzipped and uploaded successfully'
}- When you’re done, click Deploy to save and activate the function
- Check permissions if the function fails to access the bucket (missing
GetObject,PutObject, orListBucket)
Great! Next time your SFMC automation runs:
- A
.zipfile lands in the input folder in S3 - Lambda triggers automatically
- Files are extracted, renamed, and sorted
- Output files show up in clean, ready-to-use folders
Once the export and unzip process is running smoothly, there’s plenty more you can automate:
- Stream cleaned files into your data warehouse
- Add a second pipeline to load files into your CDP or other destination
- Set up notifications via SNS or Slack when files are ready.
This setup works well if you’re building a modular analytics pipeline, one where each part of the process (export, unzip, validate, ingest) is traceable and easy to debug.
If you’re facing issues with Salesforce Marketing Cloud exports, want to simplify your analytics setup, integrate a CDP, or need a hand building out real-time pipelines like this, scandiweb can help. Reach out to us today, and we’ll get back to you in 48h!

Share on: