A proper Google Analytics setup is the first step to understanding website visitors. It allows you to easily track and measure your website’s traffic and conversion goals, which leads to smart business decisions. The road to this setup, however, can be tricky for both eCommerce managers and digital marketers.
Let’s dive into eCommerce data tracking setup specifics, different setup types, and potential issues. This guide will focus on Magento 2 events tracking, as well as highlight the differences in Progressive Web App tracking setups.
In this guide, we’ll walk you through:
- Product types
- Step-by-step dataLayer setup
- Custom definitions
- Tracking setup differences between PWA and Magento
- dataLayer QA specifics
Product types
There are three main product types:
Simple products
A simple product is a physical item with a single SKU and price. Simple products can be used in association with grouped, bundle, and configurable products (specific color, size, or combination of both). Before selecting product specifics, it counts as a configurable product.
Configurable products
These are products with many options to choose from the drop-down list: size, color, or any other variation. If you have configurable products on your website, you need consistent information going to Google Analytics. You should pass a constant value in attributes ID and Name to ensure correct GA data, and pass the child (selected variation) ID and name in custom dimension to ensure that it will be possible to do dynamic remarketing and more in-depth analysis.

Bundle (grouped) products
Grouped products contain several products from one collection. The user can select which products will be added to the cart, adjust the number of products, or add the whole bundle without any configurations. Add to cart event contains either data on the products added or only the data of the bundle.
When you start working on data tracking setup, consider all types of products that are available in the store – this is important for creating dataLayer requirements described next.
Step-by-step dataLayer setup
1) Prepare the dataLayer requirements
First and foremost, you need to have access to the store’s GA and GTM accounts. If it’s not available, use GA/GTM debugger or dataSlayer tools to review the current website setup, and check the product types used on the website.
When that’s done, prepare the requirements that include the main events and their types, variable names, variable levels, values, and precise dataLayer push execution instructions. Make sure to cover all pages where certain events can trigger.
After completing the file, check with the developer who is implementing the GTM module if the functionality works as per requirements. The same requirements file will later be used in the dataLayer QA.
2) Configure GTM extension
While the GTM module setup is in progress, you can start the GTM extension configuration.
- To do that, go to the backend → Stores → Configuration → General configuration.
- Add ID, the full GTM script, and noscript snippets. For PWA stores, you only need to add the GTM container ID to the text input field (keeping in mind the number of store views).
- Next, enable the GTM module and dataLayer events.
The main difference between PWA and M2 modules: there is a section for custom variables in Magento 2, while PWA requires developer input.
3) Configure GTM container
The next step is to prepare the container with Google Analytics Enhanced eCommerce (in Scandiweb, we have a ready-made template, without one it’s a container creation from scratch).
- Import Google Tag Manager container by going to the GTM account → Admin → Import container.
- Select the container → Choose existing workspace → Select Overwrite for new setups and migrations or the Merge option to be safe → Rename conflicting tags, triggers, and variables.
- Clean up container after the merge (get rid of unnecessary or duplicate tags/triggers).
4) Google Analytics settings in GTM
- Change tracking ID to the new (client’s) GA ID.
- Configure custom dimensions and custom metrics numbers (if needed).
- Create User ID view (if needed).
- Configure custom content grouping.
5) 3rd party script set-up
Next, check if there already are 3rd party tags set up → Summarize all tags that are implemented in the store → Perform the tag update in GTM.
6) QA of the implementation
When completing the full set-up, QA the dataLayer, the 3rd party tag implementation, and enhanced eCommerce events by going through all page types on the website – homepage, category pages (PLP), search results pages, wishlist, product pages (PDP), minicart, cart, checkout, order success page and see if all events trigger correctly.
Custom definitions
Custom dimensions and metrics
If you click on any report, e.g. All pages, first you see the primary dimension “Page” and all its metrics. What you can do is add more dimensions and metrics to broaden the analysis and collect and analyze data that Analytics doesn’t automatically track. Custom dimensions and metrics are just like default ones, except you create them yourself.
How to correctly detect dimensions and metrics
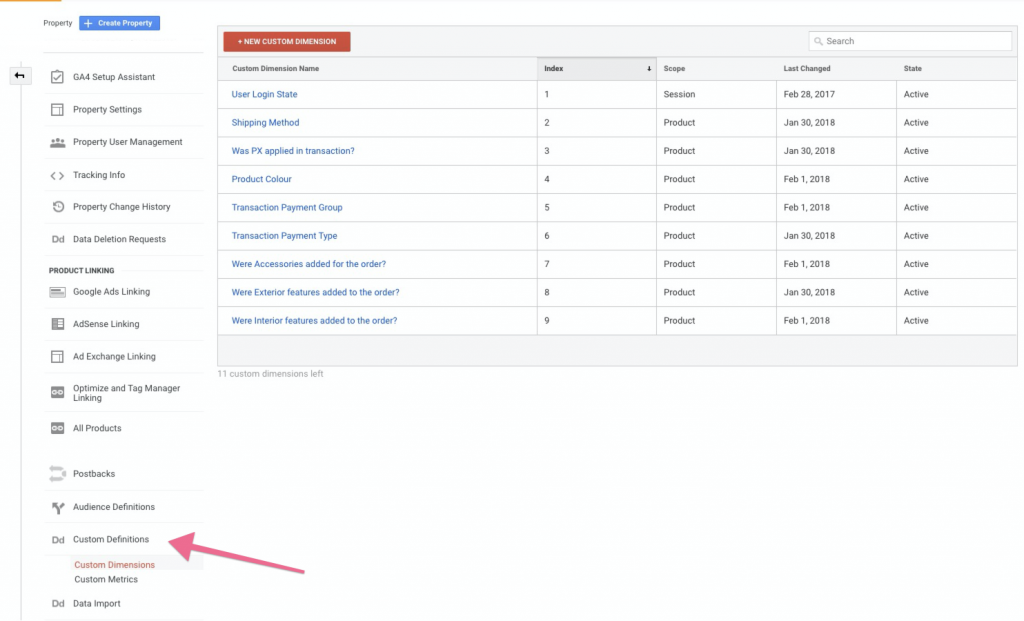
First, you need to understand if the account you are working on already has any custom data implemented. Go to GA account → Admin → Custom Definitions.
How to set up custom dimensions
- Define the data you want to pass in custom definitions.
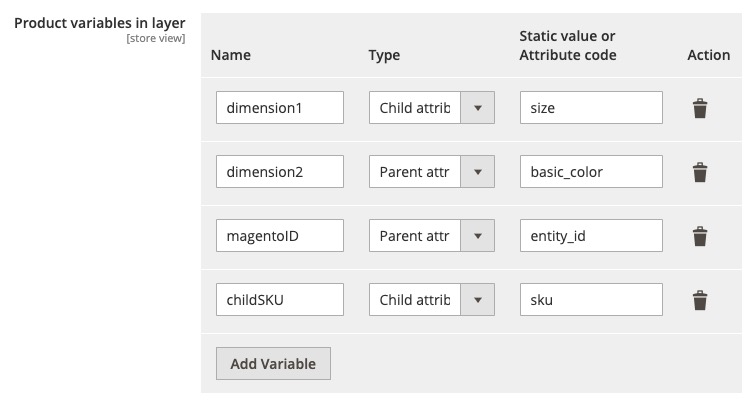
- In Magento 2, go to the GTM module → Enter the name of the dimension → Select the type → Enter the attribute name (value) you want to take the data from.
How to set up custom metrics
- Custom metrics pass numerical value, thus you either pass 1 if the statement is true and 0 if it is false.
- You can pass custom calculations in the custom metrics, for example, checkbox clicks, full bundle price, etc.
Tracking setup differences
GA settings
The customTask API is a feature of the Universal Analytics library that lets you get and set values from and to the (Measurement Protocol) hit as it’s being generated.
- Create one customTask JS script using Simo Ahava’s builder (more information on customTasks here).
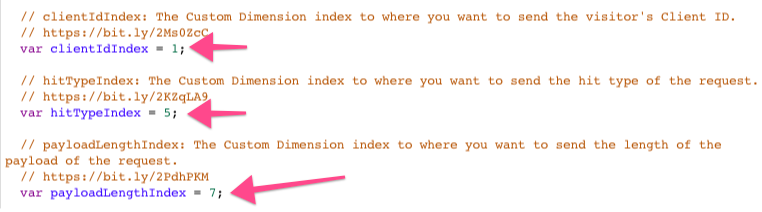
- IMPORTANT! Make sure that you take into account all custom dimension indexes already implemented in GTM when adding product scope dimensions. If needed, don’t forget to update the custom dimension index in customTask – Client ID, Hit Type, and Payload Length variable.
To ensure there is no conversion attribution shift between different marketing channels in standard reports (in PWA), for example, more conversions are reported to Google Organic and a drop from Google Ads not only in conversion volume but in traffic quality (Bounce rate, Pages per session, etc.), you need to apply a fix beforehand.
- Add a custom JavaScript variable in the GA settings to ensure that such an issue will not arise.

Pageview tracking
On a regular Magento page, GA – Pageview tag can be triggered on:
- Pageview
- History Change
- “General” dataLayer event
Since PWA is a single-page application, pageview will work only if the page is reloaded or when the user first lands on the website.
Regarding History Change, you need to enable it in GTM → Triggers → Add a new “History Change” trigger in combination with Pageview. Keep in mind that History change can fire several times per page, thus triggering Pageview tags several times per page. For most reliable data, use General dataLayer push → triggered only when a user loads a new screen.
dataLayer QA
General
This is fired on each pageview in a regular M1/M2 store, or on each new screen load in PWA stores and contains the main information about the store, user, and eCommerce data about the products added to the cart.
Potential issues to look for:
- The event might be fired twice per page.
dataLayer.push({
eventL: 'general',
pageType: 'category',
storeView: 'default',
language: 'en_US',
customerId: 'NOT LOGGED IN',
ecommerce: {cart: {total: 0, quantity: 0}, products: []},
Impression
Fired any time a product box appears on the screen → Homepage, PLP, up-sell block on the category page, up-sell block in the cart, search results page, wishlist, etc.
Potential issues to look for:
- Make sure the event is fired when a user comes back from PDP to PLP by clicking the back button in the browser.
- Make sure the correct “list” values are passed → Not simply “PLP”, but “PLP – Accessories”
- If a website uses a 3rd party module, sometimes it will not be possible to set up the event.
Product click
Fired any time user clicks on the product box and is sent to the product details page.
Potential issues to look for:
- Make sure the event is fired on the click on the image, product name, overall product box click if the “Add to Cart” button leads the user to PDP.
- If a website uses a 3rd party module, sometimes it will not be possible to set up the event.
Product Detail
Fired any time user lands on the product details page or Quick View pop-up appears.
Potential issues to look for:
- Make sure that the product IDs and Names match previous dataLayer events.
- Make sure the productDetail event is fired if a user opens the quick view (if such functionality is implemented).

Add to cart
Fired when a user adds products to the cart or increases the number of products already in the cart.
Potential issues to look for:
- The quantity is passed incorrectly when a user adds more than 1 piece of the item.
- The quantity is passed incorrectly when product quantity is increased in the cart or minicart → Usually the total number of the specific product in the cart is passed as the quantity.
- Make sure you check the Wishlist page, there might be a button “Add all to cart” that should trigger the “addToCart” event.
Remove from cart
Fired when user decreases product quantity in the cart or fully deletes it from the cart.
Potential issues to look for:
- The quantity is passed incorrectly when the user decreases the quantity of a specific item in the cart → Usually the total number of the specific product in the cart is passed as the quantity.
Checkout
On Magento 1 and Magento 2, this event is fired when a user enters the Checkout. On PWA, Checkout is already fired when a user enters the Cart.
Potential issues to look for:
- Make sure the correct Step value is passed.
- In one-step checkout, ensure that when a user starts to fill in the delivery and payment method data, checkout events with the step number are passed.
- In case you have express checkout, usually, PayPal, make sure the checkout events are also triggered.
Checkout Option
The event is fired when a user is selecting shipping and billing details.
Potential issues to look for:
- Make sure the “option” attribute is passed logically and the shipping or payment type is easy to understand.
- In case you have express checkout, usually, PayPal, make sure the checkoutOption events are also triggered.
Purchase
Fired on Order success page when the transaction is finalized.
Potential issues to look for:
- Make sure dataLayer push “general” is executed before the “purchase” event.
- Test all payment options on staging and LIVE to make sure that the user is redirected back to the website and events are triggered.
- Test express checkouts if those are available.
Any questions? Need assistance or QA of your GA setup? Feel free to contact us via [email protected]. Learn more about our data analytics services and how we can work together to improve your eCommerce site!

Share on: