
Facebook Conversions API (CAPI) is a server-side tool that links your marketing data from your server, website, or CRM to Facebook (Meta). With Facebook CAPI, you can see how users interact with your website. You can use user behavior data (UBD) received from Facebook Conversion API to customize and optimize your Meta ads and ensure your ads are shown to those users that would be among the most likely to get interested in your products and click the ad as a result.
What are the benefits of using Facebook Conversion API?
- Reduced costs per action as a result of clearer data and better event matching. Unlike Meta Pixel, data coming from Facebook CAPI is more reliable because it is less affected by browser loading issues, network instability, and privacy extensions. A combination of Conversions API and Meta Pixel can help you build a steadier connection that allows the delivery system to decrease cost per action. Also, you can add extra parameters to customer information and increase the quality of matched events.
- Optimized ads for different stages of the customer journey, e.g., post-purchase actions, in-store actions, etc. This data allows Meta to target users that are more likely to convert/take the desired action. In the end, you can significantly improve ad targeting; set up custom audiences, thanks to improved audience insights; tune retargeting, improve ad reporting, etc.
- Improved measurements and data control. Facebook Conversions API can help you better monitor ad effectiveness and attribution through the whole customer journey and thus better understand how digital advertising impacts your online and offline activities and their outcomes. Plus, if implemented separately from Meta Pixel, Facebook Conversion API provides for more control over data sharing.
Why do you need Meta Pixel for running Facebook Conversion API?
Facebook CAPI is an extra business tool that works together with Meta Pixel. The purpose of Facebook CAPI is to improve the accuracy of your Facebook tracking by capturing data that is left out by browser events tracking.
An important note: Facebook requires that you send event data both from the browser and the server. This is because of the strict privacy policies of the latest browsers and the iOS 14 update. These policies have significantly reduced the amount of data that can be tracked.
Thankfully, neither iOS 14 nor browsers can block data sent from a domain to a subdomain of its own—the latter can act as an endpoint for the server-side GTM. Once the data gets to the server, it is then sent from the server to Facebook. The data cannot be blocked because privacy-oriented browsers usually only deny third-party cookies, including direct network requests to third-party services like Facebook.
How to set up Facebook Conversion API
| ⚠️ Before setting up Facebook CAPI, you need to register as a Facebook Developer. Otherwise, you will not have access to the FB DEV Tools. ⚠️ |
Step1. Set up a Meta Pixel for browser-side event tracking
Before setting up your Facebook CAPI, you must create a Meta (Facebook) Pixel. To create a Facebook/Meta pixel for your eCommerce website, take the following steps:
- Go to business.facebook.com, and make sure that you are registered as a Facebook developer.
- In the main interface, go to the Events Manager UI.
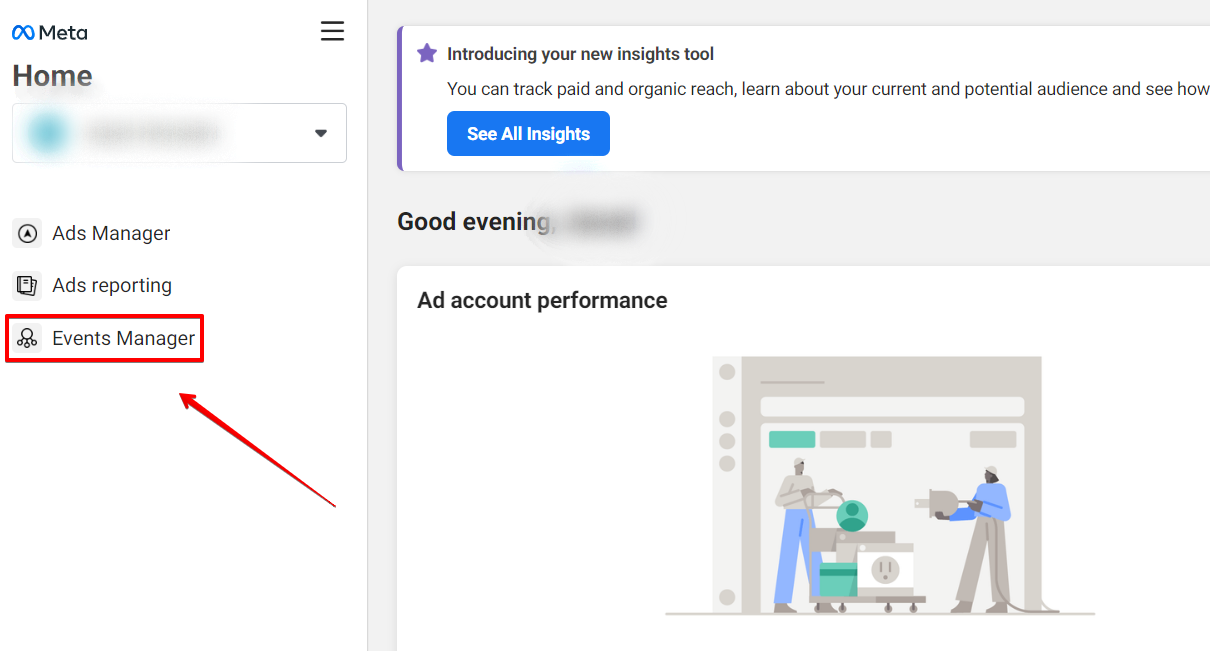
- Once you are in the Events Manager UI, press the “+” button that connects you to your data sources.
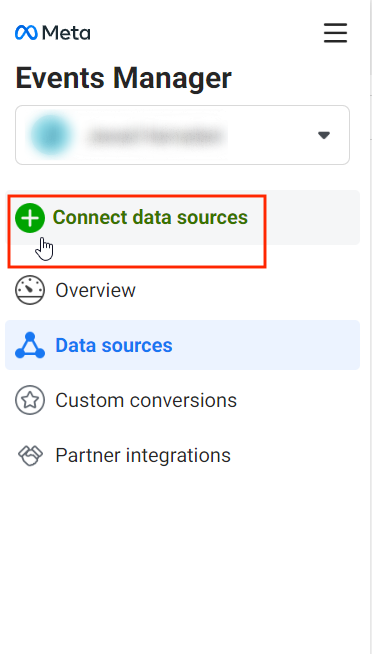
- You will then be asked to choose a data source—choose whichever is relevant. With eCommerce websites, it would usually be a web data source. Once you choose your data source, press “Connect.”
- Proceed to the name of your pixel and then press “Create pixel.”
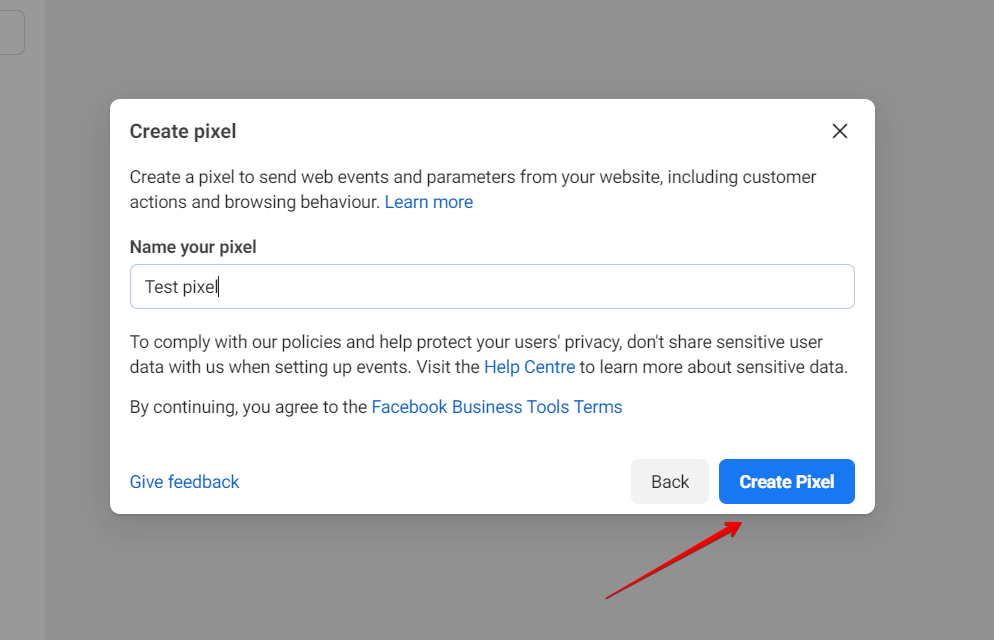
That’s it—your Facebook Pixel is created. You will also receive a pixel ID that you will use for sending events from GTM to Facebook. You can find the pixel ID in the Settings section of the Events Manager.

| ⚠️ In case a Meta Pixel already exists, you won’t need to create it. You’ll need the pixel ID to implement the browser-side FB data tracking. ⚠️ |
Step 2. Generate an Access Token
To use the Conversions API, you’ll also need an access token. You can get the access token via Events Manager. An access token is passed as a parameter in each API call.
Inside Events Manager, follow these steps:
- Choose the pixel you want to implement.
- Go to the Settings tab.

- Under Conversions API, click on “Generate access token.” Follow the instructions in the pop-up window.
| ⚠️ The “Generate access token” link will only be visible to you if you have developer privileges. ⚠️ |

- Once you have your token, go to the Overview section of the Events Manager tool and click the “Manage Integrations” button.
- A pop-up will appear. Click the “Manage” button next to “Conversions API.” (This will trigger the creation of a Conversions API app and Conversions API system user for you so you won’t need to request any further permissions or go through App Review.)

Step 3. Create Facebook events
Here you can find documentation on how to create FB server-side events and test them using the FB Dev Tools.
| ⚠️ Make sure you are registered as a Facebook Developer. Otherwise, it will not be possible to proceed with event testing and setup. ⚠️ |
The most efficient way for actually implementing the API functionality will depend on each specific eCommerce business case—depending on the platform used, existing data collection setup, available DEV resources, and budget. There are different platform integrations made available by Meta (Facebook), 3rd party modules/apps, custom API development options, and Server-Side GTM.
At Scandiweb, we usually leverage the clients’ existing Google Tag Manager setups with dynamically generated eCommerce dataLayer and proceed with the FB CAPI implementation using a Server-side GTM end-point.
| ⚠️ Before setting up events, you need to contact the analytics project lead to get the full list of required events! ⚠️ |
Here are some of the usual events on an eCommerce site:
- PageView – triggered on every page/screen view
- View Content – triggered typically on PDP view
- Add to Cart – triggered on add to cart action
- Add to Wishlist – triggered once a user successfully adds a product to the wishlist
- Initiate Checkout – triggered on the first step of the checkout
- Add Payment Info – triggered once the customer chooses the payment method and clicks on the CTA to proceed to the next step (including navigating to a third-party payment gateway or placing an order)
- Purchase – triggered once the user is on the order success page and the order has been placed successfully
Here’s a Payload Helper tool for creating FB server-side events.
Step 4: Verify the setup
Once the setup is done and the test events successfully appear in the Business Manager tool, you need to verify that:
- events are received correctly,
- events are being sent as close to real-time as possible,
- events are deduplicated correctly, and
- events are matched to users with high accuracy.
Step 5: Events deduplication
Once the setup is done and verified, and server-side events are successfully collected by FB Business Manager, you need to proceed with event deduplication because FB requires both server-side and browser-side events to be sent. For example, when a user makes a purchase, the purchase event is sent twice to the Business Manager tool.
Conditions for events deduplication
- Event name and event ID. For events to be deduplicated, you need to add two event parameters that will help FB determine if the events are the same—the event name (for example, Purchase or AddToCart) and the event ID. Learn more about server event parameters from Facebook for Developers.
After the event name and event ID parameters are set up, FB deduplicates all but the first event FB receives if the concerned events:- have the same event ID,
- have the same event name,
- are received by the same pixel ID, and
- are received within 48 hours of the first event.
- Redundant pixel and server events. Deduplicate pixel and server events if they meet these two conditions:
- the pixel’s event matches the Conversions API’s event_name, and
- the pixel’s event ID matches the Conversions API’s event_id.
- Redundant pixel and server events using fbp and/or External ID.
Deduplicate pixel and server events that meet both of the following conditions in each case:- the pixel’s event matches the Conversions API’s event_name, and
- the pixel’s external_ID matches the Conversions API’s external_ID.
or
- the pixel’s event matches the Conversions API’s event_name, and
- the pixel’s fbp matches the Conversions API’s fbp.
To sum up, for event deduplication, you need to pass the event name and event ID in the server-side events. Here’s a list of all parameters that could be sent via FB CAPI. Then, you need to make browser-side events send the event ID.
Setting up deduplication on the Browser Pixel
For better matching, you need accurate information from your events coming through both Facebook Pixel and the Conversions API.
- You must set a unique value for the eventID inside the optional eventData parameter. Here are some handy parameters that you can use:
- To send the event for all Pixels on the page, use track
fbq('track', 'Purchase', {value: 25, currency: 'EUR'}, {eventID: 'EVENT_ID'}); - To send the event for one Pixel, use trackSingle
fbq('trackSingle', 'SPECIFIC_PIXEL_ID', 'Purchase', {value: 25, currency: 'EUR'}, {eventID: 'EVENT_ID'});
- To send the event for all Pixels on the page, use track
- The eventID from the Meta (Facebook) Pixel must match the event_id in the corresponding event coming from the Conversions API.
- If the same server key combination (event_id and event_name) and browser key combination (eventID and event) are sent to the same pixel ID within 48 hours, subsequent events are discarded.
- If you are sending your events via both the browser and the Conversions API along with matching event_ids, remember that events are only deduplicated if they are received within 48 hours of when the first event with a given event_id is received.
Testing Facebook Events & Tracking the events (Magento 1)
This walkthrough will show you how to set up live test events on Facebook and Magento 1 for QA purposes.
Go to Facebook business manager, select the data source, and head over to the Test events tab. Copy the test ID.

Head over to the back-end and go to System → Configuration → FB conversions. Paste the code and hit save.
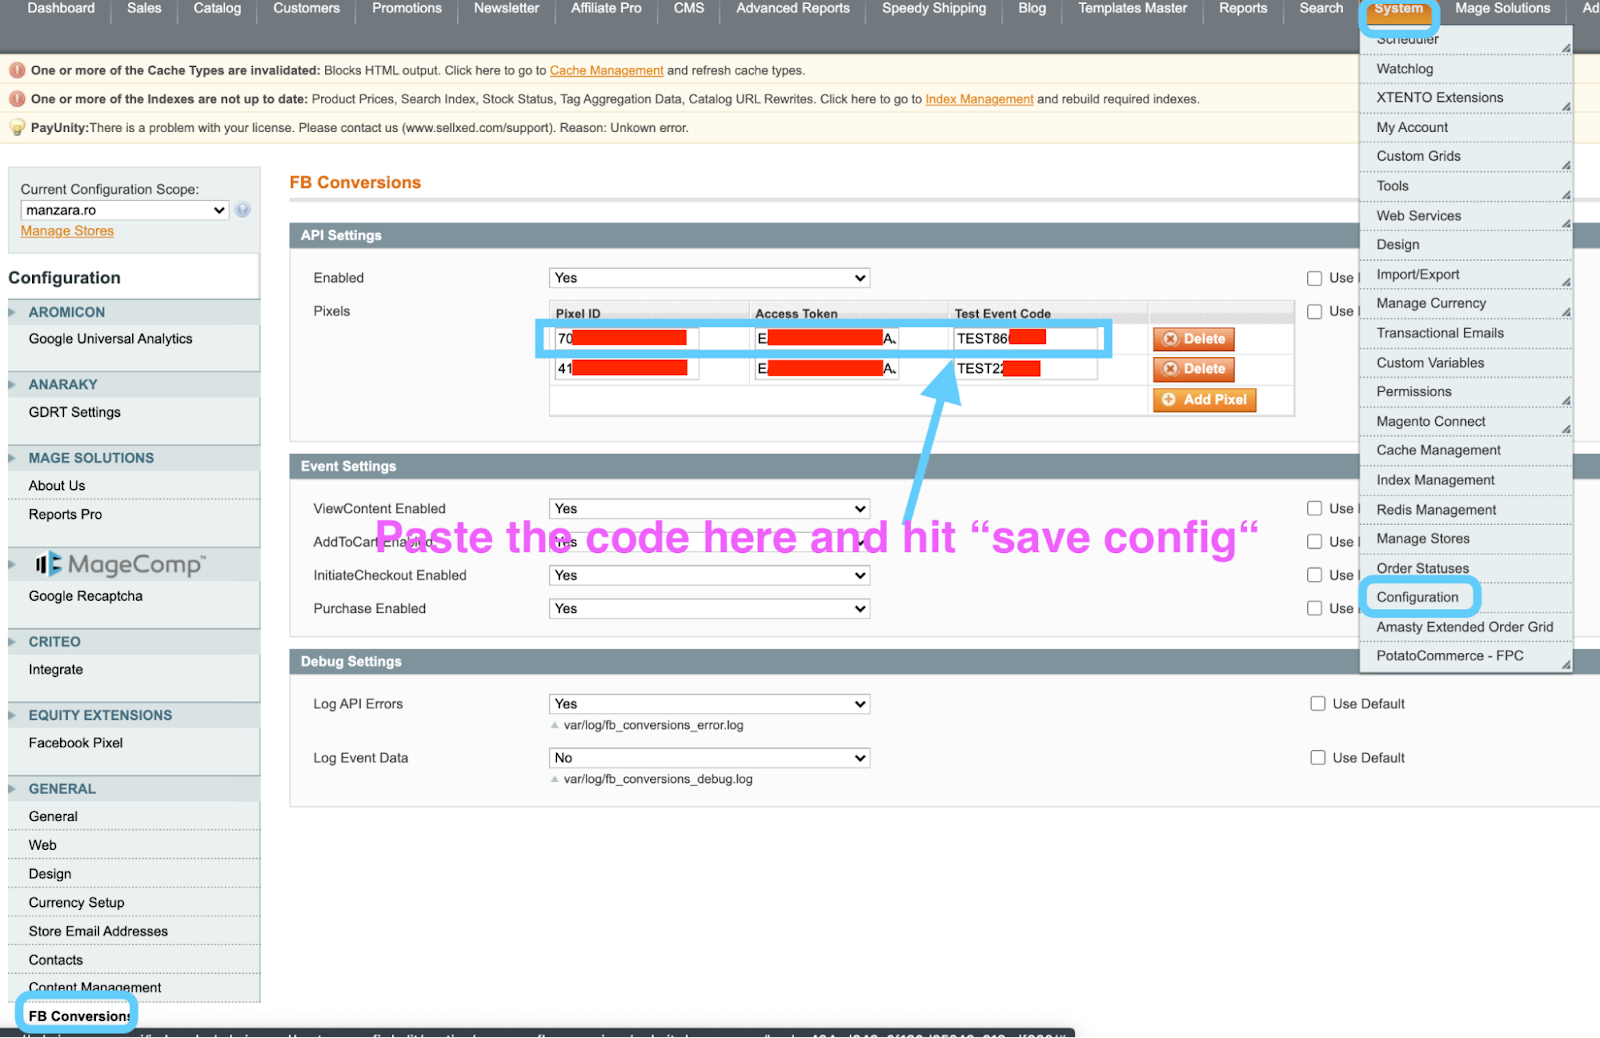
Go back to Facebook business manager and enter the site’s URL. You should be able to see the current browser and server hits being received in the account.
Now, you need to do some work in GA4 and GTM.
Step1. Creating a Google Analytics 4 client
- Create a client—you’ll need it to ‘tell’ the servers, like Google Tag Manager, what the payload is going to be so that it can recognize the data and parse meaningful event objects. GA4 already comes out of the box in server-side Google Tag Manager.
- Check the ‘Enable send to server container’ field. When you create a configuration stack, there’s going to be this option to send it to a server container—just make sure you pass it to the appropriate endpoint.
- Make sure Facebook is able to recognize and deduplicate events properly. For this, you’ll need to pass an event_id object. Punch it in the event_id field. There’s an FB tag template that you can install.
- Import Facebook Tag template. Go to Templates. There’s going to be an Event ID instance—you can find it through Gallery search if it is not shown right away. This template is relatively simple but it does its job because it ensures that it does not conflict with other IDs.
- Import Facebook tag templates to server-side Google Tag Manager and create a dedicated tag for it. Go to Templates and search for Facebook Conversions API by Facebook, the official template. You don’t have to do any of that because the template will take care of everything. Pick the same one that you imported from the Gallery and create a tag.
| ⚠️ When you’re working in server-side Tag Manager, you’re not strictly making new Tags. Every time you need something to be sent out, you’re mostly dealing with templates. That’s the big difference between the usual Google Site Manager and the server-side. The server-side still has variable triggers, but you’re not directly configuring them. You’re configuring templates. ⚠️ |
- Provide the Pixel ID and API Access token. You should already have those, so this step is not that difficult.
- Go back to regular GTM and duplicate the Facebook tags. Here are examples of tags that some Scandiweb clients are using:
page_view- ViewContent
- AddToCart
- InitiateCheckout
- AddPayment
- InfoPurchase
| ⚠️ Save all the names of the events—they must match those in the servers on the GTM side. ⚠️ |
- Create another Facebook tag. If we’re talking about ContentView, it will be the ViewContent Facebook tag—it is going to be sent to the server-side Google Tag Manager. Add the configuration tag that you’ve already created. Again, it must exactly match the one that is using the custom HTML.
- Add Event ID. Here’s where it gets a little confusing because the Event ID has already been added to the GA4 configuration. Why use it again and the configuration tag at the same time? The thing is that when the ViewContent tag gets initialized, the Event ID is already different. If you don’t add the Event ID in the parameters, the one in the configurations will be applied by default, it will be a different ID from the one that server-side Google Tag Manager sent.
| ⚠️ Keep in mind that when you’re making a configuration tag, you’ll also need to add the Event ID there and any other tag that you create. Facebook doesn’t mention this anywhere in their documentation. ⚠️ |
- Check the final setup and make the final adjustments in server-side Google Tag Manager. At this stage, you’ll need to add a trigger. The tricky thing here is the event names again. When you look at the event names mentioned in the Conversion API documentation, they are all lowercase and snake case. But as it turns out, the event name has to exactly match the one you’re using in your tag. If you change just one thing, it’s not going to work.
| ⚠️ With the names of the events, the most convenient thing would be to create one trigger and just set it to regex matching and paste it into all of your event names that you’re going to use. ⚠️ |
Step 2. Go-live testing of the Facebook Conversion API
- Copy the Facebook Events Manager testing ID.
- Paste it into the ssGTM Facebook tag testing field. This way, you’re starting to listen to the events coming from different endpoints, and they will be authorized like server hits.
- Launch ssGTM preview mode. You need to launch the server-side Google Tag Manager container first. Doing it in the preview mode is just fine.
- Launch the Facebook Test Events tool.
- Switch to regular GTM preview mode. Switch to the regular Google Tag Manager and then enable the preview mode there. As a result, Facebook will allow you to send hits from your browser, not from the tab that gets opened. When you click on Test Events on Facebook, a new tab will be opened along with the website that you added.
Fortunately, Facebook allows you to send hits not only from one tab instance but from many. If you’re testing Facebook Events and you open up another tab, you’ll start sending hits from that tab as well. If this is not the case, then you will need to actually publish the Google Tag Manager container and do testing there.
| ⚠️ Sometimes, you won’t see updates on Facebook or think it’s not working after making updates. What to do when this happens—empty the cache, close all tabs, and try again. ⚠️ |
Scandiweb Growth Team is ready to help you set up Facebook (Meta) CAPI to ensure that you get the best setup possible for your business needs and all the benefits of the tool. Book a free consultation today or send us your questions through the orange chat bubble on the right and we’ll get back to you as soon as possible.

Share on: